AngularJS Routing:
We can build Single Page Application (SPA) with AngularJS. It is a web app that loads a single HTML page and dynamically updates that page as the user interacts with the web app.
AngularJS supports SPA using routing module ngRoute. This routing module acts based on the url. When a user requests a specific url, the routing engine captures that url and renders the view based on the defined routing rules.
Let's see how to implement simple routing in AngularJS application.
Routing Example:
We will be building an application, which will display a login page when a user requests for base url - http://localhost/. Once the user logs in successfully, we will redirect it to student page http://localhost/student/{username} where username would be logged in user's name.
In our example, we will have one layout page - index.html, and two HTML templates - login.html and student.html.
- Index.html - layout view
- login.html - template
- student.html - template
The following is a main layout view - index.html.
Example: Layout view - Index.html
<!DOCTYPE html>
<html xmlns="http://www.w3.org/1999/xhtml">
<head>
    <title></title>
    <script src="Scripts/angular.js"></script>
    <script src="Scripts/angular-route.js"></script>
    <link href="Content/bootstrap.css" rel="stylesheet" />
</head>
<body ng-app="ngRoutingDemo">
    <h1>Angular Routing Demo</h1>

    <div ng-view>

    </div>
    <script>
        var app = angular.module('ngRoutingDemo', ['ngRoute']);

        app.config(function ($routeProvider) {

            $routeProvider.when('/', {
                templateUrl: '/login.html',
                controller: 'loginController'
            }).when('/student/:username', {
                templateUrl: '/student.html',
                controller: 'studentController'
            }).otherwise({
                redirectTo: "/"
            });

        app.controller("loginController", function ($scope, $location) {

            $scope.authenticate = function (username) {
                // write authentication code here..

                $location.path('/student/' + username)
            };

        });

        app.controller("studentController", function ($scope, $routeParams) {
            $scope.username = $routeParams.username;
        });

    });
    </script>
</body>
</html>
Let's understand the above example step-by-step:
- The first step is to include angular.js, angular-route.js, and bootstrap.css in the index.html. The angular-route.js includes necessary functions for routing.
- Apply ng-app directive.
- Apply ng-view directive to <div> or other elements where you want to inject another child view. AngularJS routing module uses ng-view directive to inject another child view where it is defined. Therefore, Angular will inject login.html or student.html inside this div element.
- Now, create an application module and specify 'ngRoute' as a dependency module.
- Now, we need to configure the routing rules that need to compile before any other module of an application. So, use config() method to configure the routing rules using $routingProvider object.
- Use $routeProvider.when(path, route) method to configure routing rules, where the first parameter is request URL and the second parameter is an object which contains controller, template, or other properties. In the above example, we specified that if user request for "/" URL, meaning the base url then inject login.html and loginController. In the same way, if a user requests for "/student/:username" url then inject student.html and studentController. The :username would be url parameter.
- Use otherwise() method to redirect to base url if user request for the URL other than configured rules.
- Now, define loginController which attaches authenticate() funtion to the $scope. The authenticate() method redirects to "/student/username/" using $location service.
- Define studentController which attaches username property to $scope, to display user name in the view. Notice that $routeParams is used to get the value of url parameter supplied from login view.
Create login.html as shown below, which contains username and password input box with validation. Please note that we are using bootstrap.css.
Example: login.html
<form class="form-horizontal" role="form" name="loginForm" novalidate>
    <div class="form-group" >
        <div class="col-sm-3">
        </div>
        <div class="col-sm-6">
            <input type="text" id="userName" name="userName" placeholder="User Name" class="form-control" ng-model="userName" required />
            <span class="help-block" ng-show="loginForm.userName.$touched && loginForm.userName.$invalid">Please enter User Name.</span>
        </div>
        <div class="col-sm-3">
        </div>

    </div>
    <div class="form-group" >
        <div class="col-sm-3">
        </div>
        <div class="col-sm-6">
            <input type="password" id="password" name="password" placeholder="Password" class="form-control" ng-model="password" required />
            <span ng-show="loginForm.password.$touched && loginForm.password.$error.required">Please enter Password.</span>
        </div>
        <div class="col-sm-3">
        </div>
    </div>

    <input type="submit" value="Login" class="btn btn-primary col-sm-offset-3" ng-click="authenticate(userName)" />
</form>
Create student.html with necessary fields as shown below. Visit Bootsrap Form section to learn how to create bootstrap form in AngularJS.
Example: student.html
<div>
    <p>Welcome {{username}}</p>
    <a href="/">Log out</a>
</div>

<form class="form-horizontal" ng-submit="submitStudnetForm()" role="form">
    <div class="form-group">
        <label for="firstName" class="col-sm-3 control-label">First Name</label>
        <div class="col-sm-6">
            <input type="text" id="firstName" class="form-control" ng-model="student.firstName" />
        </div>
        <div class="col-sm-3"></div>

    </div>
    <div class="form-group">
        <label for="lastName" class="col-sm-3 control-label">Last Name</label>
        <div class="col-sm-6">
            <input type="text" id="lastName" class="form-control" ng-model="student.lastName" />
        </div>
        <div class="col-sm-3"></div>
    </div>

    <div class="form-group">
        <label for="dob" class="col-sm-3 control-label">DoB</label>
        <div class="col-sm-2">
            <input type="date" id="dob" class="form-control" ng-model="student.DoB" />
        </div>
        <div class="col-sm-7"></div>
    </div>

    <div class="form-group">
        <label for="gender" class="col-sm-3 control-label">Gender</label>
        <div class="col-sm-2">
            <select id="gender" class="form-control" ng-model="student.gender">
                <option value="male">Male</option>
                <option value="female">Female</option>
            </select>
        </div>
        <div class="col-sm-7"></div>
    </div>

    <div class="form-group">
        <div class="col-sm-3"></div>
        <div class="col-sm-2">
            <span><b>Training Location</b></span>
            <div class="radio">
                <label><input value="online" type="radio" name="training" ng-model="student.trainingType" />Online</label>
            </div>
            <div class="radio">
                <label><input value="onsite" type="radio" name="training" ng-model="student.trainingType" />OnSite</label>
            </div>
        </div>
        <div class="col-sm-7">
            <span><b>Main Subjects</b></span>
            <div class="checkbox">
                <label><input type="checkbox" ng-model="student.maths" />Maths</label>
            </div>
            <div class="checkbox">
                <label><input type="checkbox" ng-model="student.physics" />Physics</label>
            </div>
            <div class="checkbox">
                <label><input type="checkbox"  ng-model="student.chemistry" />Chemistry</label>
            </div>
        </div>
    </div>

    <input type="submit" value="Save" class="btn btn-primary col-sm-offset-3" />
    <input type="reset" value="Reset" ng-click="resetForm()"
</form>
Notice that login.html and student.html starts from <form> tag, because they are going to be injected in to layout page - index.html. The layout page already contains head and body tag.
Now, when you run the application, it will display a login page as shown below.
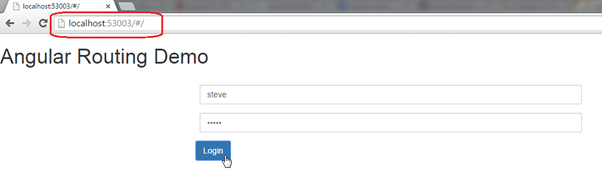 Routing
Once you enter username and password, it will display student page with supplied username as shown below.
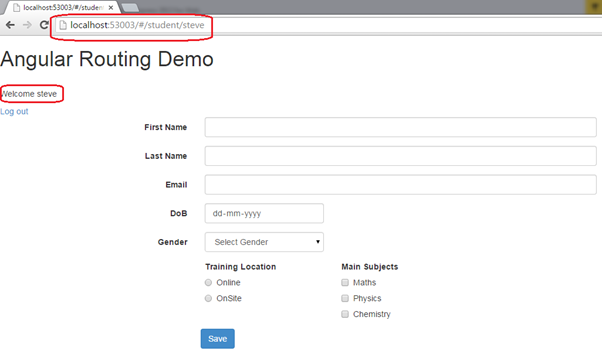 Routing
Note :
AngularJS appends '/#/' to the url to redirect to a particular url using $location service. For example, to redirect to '/student', the url would be http://localhost/#/student.
Thus, you can use routing to create a single page application in AngularJS.